
How to Attach Strap Anchors - A Hardware Installation Tutorial
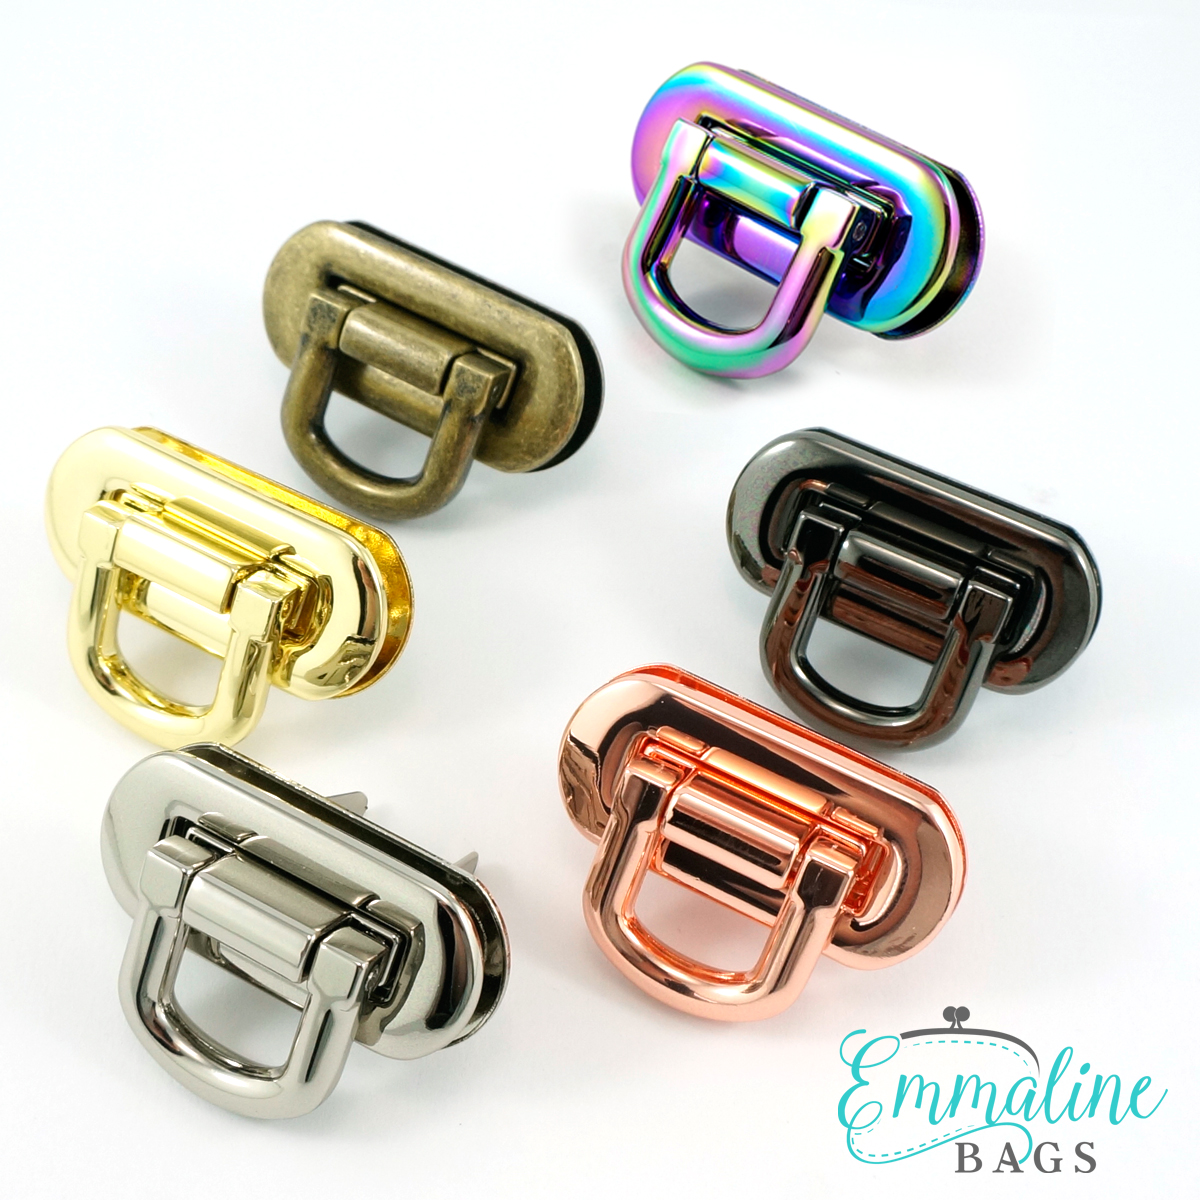
8/13/2016 04:58:00 PMHey Bag Makers! We've got some great new strap attachments in the hardware shop at emmalinebags.com, and Cyndi from The Nosy Pepper is going to run you through this easy tutorial so you can see how easy they are to apply. The strap anchors come in either shiny nickel or gold finish and are available on our website: HERE

How to Attach our Edgwena Strap Anchors

The Edgwena Strap Anchors are a great way to add some bling to your bag and are super easy to install. Sew up your bag as you normally would (minus adding the straps of course) and install the strap anchors at the very end of making your bag. Normally, adding new pieces of hardware at the end stresses me out, but these are so super easy to install. So much easier and quicker than having to add fabric tabs to your bag.
Important: make sure that you reinforce the area that you will be attaching your strap anchors to. I used flex foam on the exterior of the bag, which gives a bit of support (and bulk) so I just added a few layers of woven interfacing on the lining side of my bag. If you plan on only using fabric without any kind of stabilizer, consider adding some peltex to give the screws something to bite into without adding stress to your pretty fabric.
Once you have completed your exterior, gather your Edgwena Strap Anchors, the itty bitty screws, some fray check, a marking pen and a small Phillips screwdriver (I used one that came to change batteries in toys).
Mark where you want your Edgewenas to sit on the top of your bag:

The easiest way is to find your centre point of the bag top and then measure away to both the left and right of centre. Once you are happy with your placement, use your marking pen to mark where you want them:

Now the fun part. Slide your Edgwenas on and make a mark to denote the screw holes on the lining side of your bag:


Go slowly, these tiny screws strip out really easily. It's easier if you start to screw it in a couple turns then slide it back on your bag, taking care to line the hardware up with your “pilot holes”. They have to be set in just so or else they cause you to want to say bad things as you unscrew them for the fourth time.


Now that your Edgwenas are all in place, we need to make some straps!
I made 1” wide straps, but ¾” would also work nicely. Go through the tedious process of fusing, pressing and stitching your straps:

Once they are done, just attach them through Edgewena’s loop and stitch them down like you would any with any other ring.


And you're all done! Easy peasy and so much quicker than making strap tabs. They look so professional and add a class to any bag.


Here's my gorgeous new cork bag with it's lovely straps, and seriously, this took no time at all.

We'd love to see the beautiful and imaginative ways you have used your Edgwena Strap Anchors too! Please share your photos in our facebook group "Emmaline Sewing Patterns Group", as well as tag us on instagram with @emmalinebags and hashtags #emmalinehardware #emmalinebags. We love to see your work!
Thank you for reading,
Janelle & Cyndi

Once they are done, just attach them through Edgewena’s loop and stitch them down like you would any with any other ring.
And you're all done! Easy peasy and so much quicker than making strap tabs. They look so professional and add a class to any bag.
Here's my gorgeous new cork bag with it's lovely straps, and seriously, this took no time at all.
We'd love to see the beautiful and imaginative ways you have used your Edgwena Strap Anchors too! Please share your photos in our facebook group "Emmaline Sewing Patterns Group", as well as tag us on instagram with @emmalinebags and hashtags #emmalinehardware #emmalinebags. We love to see your work!
Thank you for reading,
Janelle & Cyndi


16 comments
Yay!!! I want to never sew strap tabs for handles again, thanks Janelle!
ReplyDeleteThank you goes to you, Cyndi! Great post!
DeleteLovely tutorial, and the bag looks fabulous with that professional-looking hardware!
ReplyDeleteThey look beautiful! Do those tiny screws really hold the weight of the bag when it's loaded down with all the crap we tend to carry?
ReplyDeleteHi Kim, if you are carrying a lot, you would want to add a shoulder strap and not use the handles for that, but if you use peltex, glue, and bite into something of substance that won't tear, you will have sturdy handles.
DeleteCould you please let me know where you sourced the cork fabric? I love these new strap anchors. Thanks for the tutorial - and I, too, have said a few choice things while chasing screws.
ReplyDeleteHi there! The cork is from sewsweetness.com !!
DeleteJanelle do you have a tutorial for attaching the long john strap anchors? I thought I read that you did but I can't seem to find it. Tks!
ReplyDeleteHi AJ, there isn't one yet, but I've added more instructions and a placement template to the page where they are sold. Here is a link to that: https://drive.google.com/file/d/0BzYHLeZJ6oViUmdXcW1ZUkdOUEE/view?usp=sharing
DeleteTks! I'll check that out now. I have some on the way! So excited:)
DeleteGreat tutorial. I Love the beautiful colorful street scene fabric used on the bag on the beginning of this tut. Where did you find it? Thanks, Rita
ReplyDeleteHI Rita. Thank you! I think you might be talking about the Wanderlust fabric panel by Hoffman fabrics! It's called Rome in Summer, the Wanderlust collection. Search Hoffman fabric
DeleteHi Janelle, do you have any news on the new straps? I can't wait to see these back in stock. Thank you, Eline.
ReplyDeleteHI there, there has been a bit of a delay in manufacturing, so they will be a few more weeks yet. Hopefully before the end of November we should have them.
DeleteHi Janelle, I was wondering if you had any other feedback on getting the screws to go through the holes in the strap holder. I have been trying to install the Edgwena handles and it is enough to make a preacher swear! The screws are too big to go through the holes. I wouldn't be stripping the heads if they would go through the holes! I've had some trouble with other screw on products also. I'm pretty much done with these tiny screws! Judy
ReplyDeleteYes Judy, we have redesigned the strap anchors and although they will look exactly the same as before from the front, the screw attachment on the back is much improved. They will be ready for us to sell soon. For you though, the best way for me to help you is for you to email me at janelle@emmalinebags.com. It will be much easier for us to communicate about this matter over emails.
DeleteNote: Only a member of this blog may post a comment.