
How to Install Purse Turn locks and Flips Locks in Bags and Purses: A Tutorial
11/01/2013 09:06:00 PM
The following instructions are for two kinds of locks, but they are installed almost the same way. Once you figure out what the little parts are in these locks, when you get some that are a slightly different style, you won't have any troubles figuring it out on your own.
I will show you how to install:
1) Purse Turn Locks (also called twist locks) in two different ways:
a) with prongs
b) with screws
2) Flip Locks (installed with the same method, but a slightly different hole is cut).
1) Purse Turn Lock With Prongs:

1 face plate for the front of your opening flap
1 back plate for the back of your opening flap
1 turn part for body of your bag or wallet
1 washer to attach the turn part
What you will need:
1 heavy interfacing or Pellon Peltex square about 2" square
Fraystop or Fraycheck fray stopping liquid
sharp scissors
marking pen
Glue for metal that dries clear, such as Beacon 3-in-1
Seam ripper or craft knife


1) Place face plate of twist lock (with prongs) upside down where you want to be and trace around the opening for your hole.
2) Using pointy tipped embroidery scissors, cut out hole, making it large enough so that when you place back piece in from the back, you can see all the metal edges, but be careful not to make hole too large!
3) Use Fraystop on edges, and wait for this to dry.
4) Sparingly, squeeze strong fabric adhesive onto both sides of the hole pieces. (Glue is optional)
5) Place both sides over hole, and squeeze together making sure they are perfectly straight. Use something very strong and hard (like a screwdriver or edge of scissors) to push down prongs onto back plate.
 |
| Click to enlarge |
Attach turning part of twist
lock:
1) Find center of your exterior piece of your bag or wallet by folding in half on edge. Measure down to where you want your turn part placed, and at exact center, mark a dot. (You should have a heavy interfacing or Pellon Peltex square about 2" square on the back side of your fabric at this exact spot.) 2) Using the prongs on the back of the twist part of the lock as a guide, draw two lines where your prong holes will be cut.
3) Using seam ripper or embroidery scissors, cut the prong holes for the twist lock. Do not make them too big, smaller is better than bigger. Use Fraychecktm on holes if desired.
4) Place the lock in from the exterior, place washer with slots over prongs and using a metal tool such as a screw driver or the edge of your scissors, flatten out prongs making them as tight as possible.
 |
| Click to enlarge |
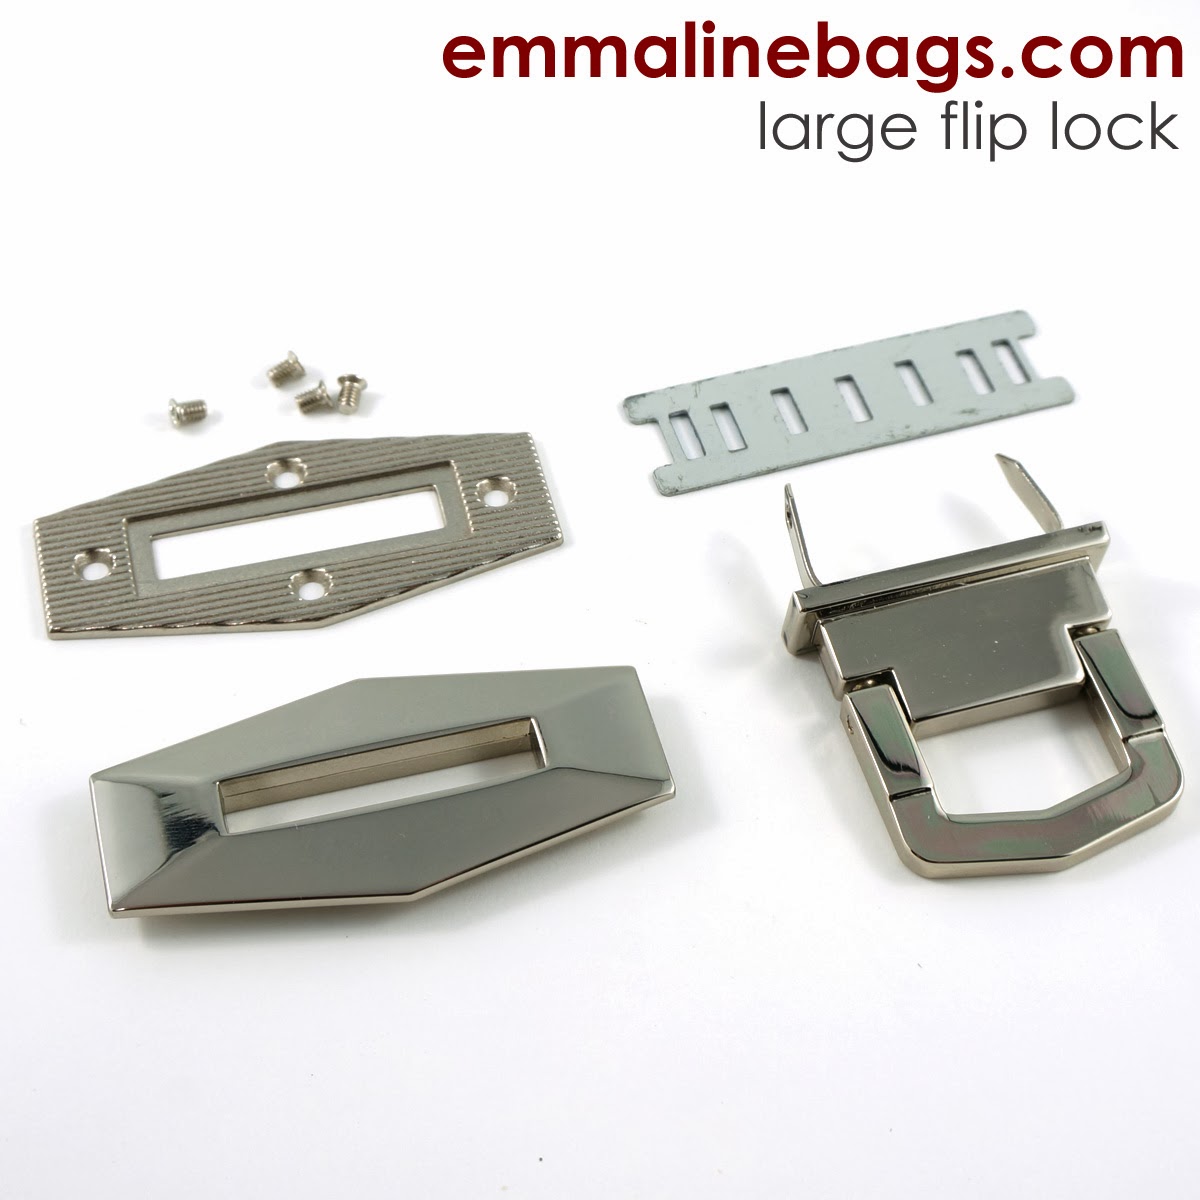
2) Purse Turn Lock With Screws:
What parts you will have:
1 face plate for the front of your opening flap
1 back plate for the back of your opening flap with screw holes
Screws to attach back to front plate
1 turn part for body of your bag or wallet
1 washer to attach the turn part
1 small screw driver to match size of screws
1 heavy interfacing or Pellon Peltex square about 2" square
Fraystop or Fraycheck fray stopping liquid
sharp scissors or leather punch for screw holes (optional)
marking pen
Glue for metal that dries clear, such as Beacon 3-in-1
Seam ripper or craft knife

These are the instructions I send with my locks when they are purchased from my website. The instructions are very similar to the ones above, but you will need to make screw holes for the screws to attach the back plate to the front plate, and you won't be bending any prongs. You can click the photo to enlarge the instructions.
 |
| Click to Enlarge |

What parts you will have:
1 face plate for the front of your opening flap
1 back plate for the back of your opening flap with screw holes
Screws to attach back to front plate
1 flip part for body of your bag or wallet
1 washer to attach the flip part
What you will need:
1 small screw driver to match size of screws
1 heavy interfacing or Pellon Peltex square about 2" square
Fraystop or Fraycheck fray stopping liquid
sharp scissors or leather punch for screw holes (optional)
marking pen
Glue for metal that dries clear, such as Beacon 3-in-1
Seam ripper or craft knife
Attach front and
back plates of flip lock:
1) Place your backing plate over the mark
where you want your plates to be, & measure from edges to make sure it is
straight and even. You REALLY don’t want
this crooked!
2) Trace the center rectangle, and mark
dots where the screws will go.
3) You have two options for cutting out these
holes. If you have a leather punch, go
ahead and punch out the screw holes [I have heard a hammer and nail work too
;)] If you don’t, then draw yourself a line that goes around the 4 screw holes
in a diamond shape, staying as close to the holes and the center rectangle as
you can. (See cut out in picture 3 below.) Use your seam ripper or craft knife to cut a slit
for your scissors to fit in and carefully trim out the center rectangle (if
holes are punched) or diamond shape. Hold your scissors very straight so the cutting
is even on the back. Trim slowly and only trim little bits at a time so you
don’t make your hole too big!!
4) Pop your front plate underneath so you
can have a look and see if you have trimmed out enough and there is no fabric
left in the center rectangle and the screw holes (see picture 3).
5) This part of the project is kind of like
doing a craft because you get to use glue! Do a dry run: Place the front plate and back plate
together with the flap in between and make sure everything lines up
properly. Make note of how you will have
to make sure that front plate is straight and even when you put it
together. Now it’s time to glue. On the back of the front plate, spread a
small amount of glue around screw holes, etc. Don’t get too close to the edges. A toothpick works great for spreading if you need to.
6) Place your front plate on and make sure
it is very straight (use a ruler!) then press down into glue to secure, and
then flip it over so you can press the fabric into the glue from the back (see
picture 3 below).
7) Put glue on your back plate and press in
place.
 |
| Click to Enlarge |
Add Flip Part of
Lock: (Caution: You will need to reinforce the area you
are placing your lock on with a square of Peltex or heavy fusible interfacing
before attaching.)
1) Find center of the section of your bag/wallet
where the lock will be and mark a dot.
2) Using the metal washer and the holes that the
prongs will go through as a guide, draw two lines where your prong holes will
be cut. Make sure these are perfectly even and the same distance from the edge
of the fabric or your lock will be crooked!
3) Using your seam ripper or craft knife, cut two
prong holes for the flip lock. Do not
make them too big, smaller is better than bigger.
4) Use
Dritz FrayCheck or FrayStop on holes.
5) Place the
lock in from the exterior, place washer with slots over prongs and using a
metal tool such as a screw driver or the edge of your scissors, flatten out
prongs making them as tight as possible. (ALWAYS put something underneath so you don’t scratch your
metal hardware. HINT: Because the flip lock
sticks out, try putting it on the edge of a table and letting the ring hang off
of the edge.)
 |
| Click to Enlarge |
Thanks for reading, and happy sewing!!


13 comments
Thank you for this tutorial. I have never seen those purse locks locally before.
ReplyDeleteGlad you like them! I am in Canada, but I ship to USA and internationally 5 days per week! J
DeleteThis is a wonderful and informative tutorial, thank you so much Janelle, I can't wait to pick up my purse supplies from my Mom in NM and I will just so happen to be seeing "Patchouli Moon Studio" (Daryl, the women who wrote above) right after seeing my mom, so I will show her the flip lock I bought from you.
ReplyDeleteThank you, Mara. Sounds like your trip will be wonderful. I hope it is soon! j
DeleteIs there a quality difference between screws or prongs? I'm guessing not but thought I'd ask as the ones with screws always seem to sell out whenever I'm looking for locks.
ReplyDeleteHi Jessica! The front and back plates of the screw type are solid metal, and do look a bit more professional.The prong type is till good quality, but of a lighter material and the back plate does not quilt look as nice. Some ladies with arthritis, have trouble with the little screws, and find the prong type easier.
DeleteI am truly addicted to Janelle's line of bag hardware. Why go anywhere else when you have everything you need right here. The quality surpasses anything out there.
ReplyDeleteHi Janelle. I have used lots of these - as you may know - and I have been wondering about the fact that there are always three screws in the set and the turn lock part have holes in the arms and there is a hole in the centre of the washer. Is there an alternate installation that puts this third screw through these holes? It does mean that the arms will flip to the middle rather than the outside making a bit bulkier finish. Just curious and have not tried it.
ReplyDeleteHI Patty!! The extra screw is just an extra part in case one is lost or not threaded right! Just a precaution!
DeleteAs I suspected but one of the Bag-ettes was wondering. She has become seriously enthralled with making NCWs - not like she is the only one. We are accumulating an outrageous number of spare parts - : )
ReplyDeleteLife saver. Well....bag saver. When making new bag I realized I had never installed a flip lock before. Since it came with no instructions I turned to your excellent tutorial. It looks great now. Perfect fit. Thank you very much.
ReplyDeleteI am so glad it helped you! Yes, on our website where our products are sold, there are links to all of our installation tutorials. I hope to be adding videos for these soon too!
DeleteWhat would you recommend for knitted purses that are a bit flimsy?
ReplyDeleteNote: Only a member of this blog may post a comment.