
A Modern Wedding Quilt - Cutting, Piecing, and Quilting Instructions For YOU!
8/29/2013 04:39:00 PM
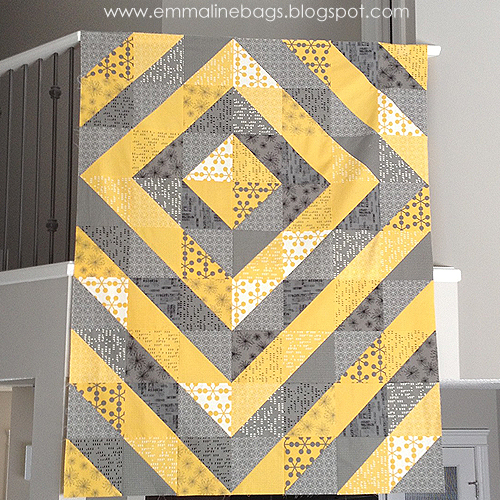
The Asymmetrical Wedding Quilt
by Janelle MacKay
If you'd like to see more photos, and read more about this quilt, read my previous post:
Finished Size: Approximately 54" x 69"

If you would like to make a modern quilt that is quick and VERY easy to put together, this is a great one to try. I've made this quilt with a quick cutting and sewing method using fat quarters and instructions from this tutorial by Lindsay at Craft Buds. Hop over to the tutorial as see how easy it is, you will make 8 blocks at a time!
I was first inspired by this picture of a Diamond Ripples quilt block done by Hadley at Flying Blind On A Rocket Cycle. This was just one quilting bee block, and the large finished quilt is just stunning. You can see it HERE.
 |
| Source: Flying Blind on a Rocket Cycle |
I LOVE the grey, pink and orange together and was looking for something similar, but when I saw Comma From Zen Chic for Moda, and that it matched well with the wedding invites, I knew I would have to be working with these gorgeous greys and golds. BUT... I wanted my pattern to be on a much, much larger scale, so Lindsay's tutorial was perfect!
Fabric Requirements:
16 Fat quarters (18" x 22") (8 in grey or dark print and 8 in gold or light print)
3 1/2 yards of coordinating backing fabric
3/4 yard binding fabric
Twin size batting (at least 58" x 73")
Coordinating quilting thread
Instructions:
- This quilt is made from 63 - 8" Half Square Triangles (HSTs) that are laid out in a 7 x 9 grid.
- Using Lindsay's method, with 8 dark and 8 light fat quarters, you will make 64 HSTs, leaving one extra HST that you will throw in your scrap bag and find next year.
- START by going to the tutorial and begin under the 3rd photo with the instructions that read "Spread out and stack two of your fat quarters, and trim to an 18″ x 18″ square ". I go ahead and pair one light FQ and one dark FQ together, right sides together at this step and then continue on with the instructions until you have sewn and cut all 8 of your pairs of FQ's and trimmed the HSTs down to 8". (To make it even faster, you could cut 4 or 6 layers at a time.) You should have 64 HSTs when you are done. Be sure to leave Lindsay a nice comment about her awesome tutorial! Thank you!
- NOW lay out your HSTs in 7 x 9 grid that looks like this:

- With right sides together, pin blocks in each row on one side, use a 1/4" seam allowance and stitch the blocks together in each row. Press seams open (Alternatively, press all seams to one direction in one row (right) and one direction in row below (left) and continue alternating left and right until all 9 rows are done.)

- Prepare your backing fabric by cutting it into two large sections, and sewing it together with a seam across the width (horizontal). Press seam open. Your backing will be approximately 63" x 88".
- Baste your top, batting and backing together as desired. I like to use spray basting. This is a great tutorial for spray basting.
- Quilt as desired. I have quilted with gold thread in the gold fabric and grey thread in the grey fabric, using a straight line quilting method, following the diamond pattern in the quilt. To do this, I started with the centre grey diamond, quilting in the ditch, and then continuing on to quilt all the grey areas of fabric, and then the yellow. I quilted approximately 5/8" (I think!) apart using a quilting bar attached to my machine to measure. However, I would recommend you measure the width of your coloured stripes and divide it into equal parts to determine how far you want apart your lines. As recommended by my local quilt shop, this time I used a top-stitching needle with my integrated walking foot and it worked like a dream.


- Bind using your favourite method. I did machine binding, using this method from Red Pepper Quilts and it worked fantastic for me. The only thing I do differently is attach my binding on the BACK of the quilt in stead of the front in the very beginning so that it folds over to the front when I am machine sewing it down. I machine sew it down on the front instead, and yes you will see all the stitching on the front of the binding, but I feel it gives me better control of how the front of the quilt will turn out. If I do it the "proper" way, I am sewing on the front side and it looks pretty, but sometimes when I flip it over I see that I have missed the binding edge and it makes me grumpy. You can decide on your favourite way, her tutorials are so amazing and helpful.
I hope you make one of these for yourself or someone else. They make a great gift, and are just the right size for two to cuddle under on the couch!

Let me know if you have any questions. Thank you so much for looking, please leave a comment!


14 comments
I loved this quilt from the moment I first saw it. The asymmetry, the colors, the quilting all drew me in. Thanks for sharing the tutorial!!!
ReplyDeleteSimply awesome! The tutorial is great!
ReplyDeleteThis quilt is stunning...Thank you so much for the tutorial...so generous of you!
ReplyDeleteWonderful job Janelle! The quilt is fantastic!!! Cindy
ReplyDeleteJanelle, what a sweet quilt, and in my fave colors! You can send it to.... heheh. Just kidding! Thanks for linking to my HSTs tutorial, and I hope you have a great weekend!
ReplyDeleteCan you tell me which of the Comma by Zen Chic patterns and color combinations you used? I love this quilt!
ReplyDeleteSpectatular quilt! I've made that pattern before but not in the asymmetrical alignment. That makes it really pop!!! I would love to know where you got the fabrics.
ReplyDeleteI love this quilt - and my grandson is getting married and his finance would like this quilt. It is called a wedding quilt, but is shown as twin size. Any tips for making it into a queen??? I'm a quilt maker but not a great one. Thank you. I'll keep checking back here for tips.
ReplyDeleteI love this quilt - and my grandson is getting married and his finance would like this quilt. It is called a wedding quilt, but is shown as twin size. Any tips for making it into a queen??? I'm a quilt maker but not a great one. Thank you. I'll keep checking back here for tips.
ReplyDeleteIt is simply beautiful and so very generous of you to share your tutorial! I can't wait to try this. Thank you!
ReplyDeleteThis is a lovely quilt and I'm thinking of making one for a wedding
ReplyDeletegift, do you know approximately how many hours it will take to make?
thanks, please email annemarie@fgsinc.ca
Beautiful quilt and fantastic tutorial. Thanks! Now to buy more fabric!
ReplyDeleteYoBit enables you to claim FREE CRYPTO-COINS from over 100 unique crypto-currencies, you complete a captcha one time and claim as many as coins you want from the available offers.
ReplyDeleteAfter you make about 20-30 claims, you complete the captcha and resume claiming.
You can press CLAIM as much as 30 times per one captcha.
The coins will stored in your account, and you can exchange them to Bitcoins or any other currency you want.
It looks very nice. These colors are great! Thanks for sharing these tips with us. I appreciate it and admire your work. Thanks a lot! Each of your posts is very inspiring.
ReplyDeleteNote: Only a member of this blog may post a comment.